Thursday, May 23, 2013

Chicken soup Seafood/Minced porrk/ Abalone porridge

Making something light and simple today. Chicken soup porridge with minced pork and abalone. You can play around with the ingredients to include other seafood like prawns if you like as in the 2nd photo.

Abalone porridge with Minced pork

Seafood porridge with minced pork and carrots & oyster mushrooms


The key to this is having a nice chicken broth to make the meal tasty, without the use of salt and sugar.

You will need to prepare the chicken stock before hand.

Chicken stock preparation

Ingredients for chicken stock

- 2.5 litre of water
- 3 fillet of chicken breast.
- 1 inch of smash ginger, without skin
- 1/2 stalk of spring onion, the lower white half.

Chicken stock cooking steps

1. Boil 2.5 litre of water. Add the smash ginger and spring onion. Bring to boil with lid cover
2. Add the chicken breast and turn the flame down to medium and close lid to boil.
3. After 30mins, the soup should taste of chicken stock, reduce flame and boil for another 45mins to hour at small flame. Once the soup taste naturally sweet, you are done.

Ingredients to make the porridge

- to serve 2 pax, 1 cup of jasmine white rice.
- minced pork, portion for 2
- 1 red carrot.
- abalone, portion for 2
- prawns (optional)
- 1 rinsed spring onion, chopped.
- some sliced ginger

Abalone minced pork cooking steps (after chicken stock is ready)

1. Rinse rice until water is clear. Add to cooking pot.

2. Add enough water to cover the rice by over 3 inch. (doesnt matter if its more since I will be throwing the excess away. However, it cannot be too little)

3. Cook the rice over medium flame and stir occasionally to prevent it sticking to the pot base.

4. Throw away any excess water when rice is almost ready and add chicken soup to cover rice into the rice pot. Continue to simmer.

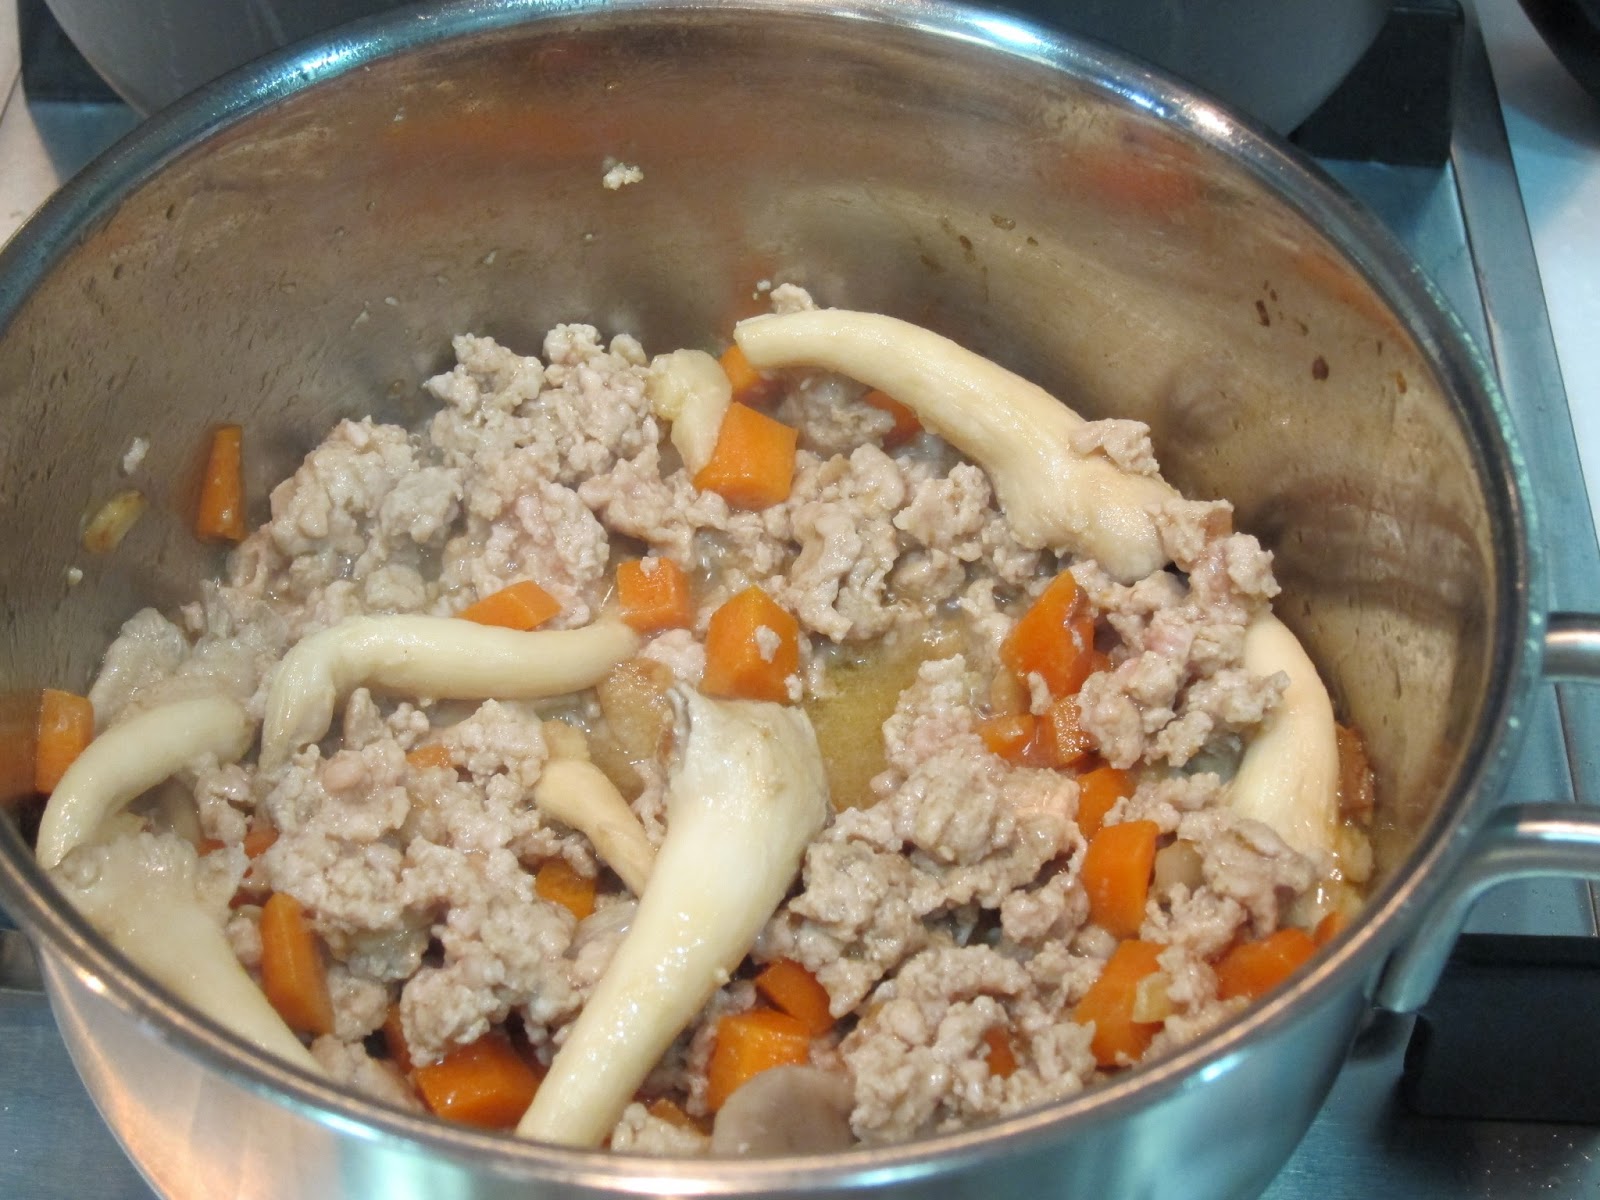
4. Meanwhile in separate pot, stir fry sliced ginger and garlic with sesame oil till slightly brown. Add minced pork, chopped abalone sides, chopped carrots (and whatever ingredients you like to add to your soup porridge) and stir. (For those who like heavier flavor, u may add salt, soy sauce and pepper) Add a dash of sesame oil for fragrance.


5. When ingredients are cooked, add to the porridge simmering in chicken soup stock.

6. Only Add fresh prawns now to the mix if you like to have some.

7. When prawns are cook, remove form flame and scoop into bowl. If you prefer it to be more soupy, add more soup into the porridge.

You are done. You may add dash of pepper and fish sauce for taste if you like but its optional.


Friday, May 3, 2013

Steamed Bamboo Clams, garnished with fried garlic and chilli.

I saw some bamboo clams in the market today and decided to give it a go. It was yummy and fast to cook! Under 2 mins!


I havent cook any before because i never knew what they were called in Cantonese in Hong Kong. It was only because this lady was ordering some for her steamboat that piqued my interest as she was calling out a name I have never heard before. Then Viola! Saw those lovely fresh live clams!

I asked the fishmonger for cooking instructions and it's sooooo freaking easy and cheap.All it took was to steam them for 2-3 mins with ginger slices and they are done!

What I did was to fry some chopped garlics, deseeded chopped chilli in some coconut oil. When the clams were done after 2 mins, I scooped the fried ingredients and together with the oil, drizzle over the clams as in the photo. After which, for those who prefer some sauce to go with, mix 1/2 teaspoon of soysauce with some water and drizzle over the clams as well. Garnish with spring onion as well. Done!
Steamed bamboo clams

A yummy dish served under 5 mins!

Tip: The garlic gives it a nice roasty crunch and the chilli after frying is no longer spicy. However if you want to retain that spicy effect, fry the chilli separately and remove from frying oil before it loses the redness.


Monday, April 29, 2013

Honeyed Soya sauce with Apple Cider Vinegar Chicken Thighs

Took me 3 separate attempts to perfect this dish to the balanced flavor I like. This is a modified version from the Filippino's version since I like my meat to be more balanced with a tinge of sweetness.


Servings: 2 pax

Time to cook: 25-30 mins

Ingredients:

- 4 chicken thighs.
- 1/8 cup of Apple Cider Vinegar
- 1/8 cup of Mirin
- 1/4 cup of (Gluten free) Soya Sauce
- 5-6 tsp of honey on standby.
- 1/2 cup of water
- 3-4 sliced large cloves of garlic

Cooking Steps:

1. Mix water, soya sauce, mirin, sliced garlic and Apple Cider Vinegar into a sauce pot. Bring to boil.

2. (Optional): If you have a griller, turn up the griller to about 250 degree C on fan forced.

3. Add chicken thighs into the boiling sauce with skin side down. Lower the heat to medium or medium low to simmering heat. Cover lid for 10mins

4. Flip the chicken (only once) and leave to cook in simmering sauce for another 10mins. You dont have to cover the lid.

5. Remove chicken from the sauce pot and add 2-3tsp of honey to the sauce to sweeten. Bring sauce to boil and WATCH over the sauce, careful not to burn it.

6. When the sauce starts to thicken, taste. If it is sweet enough, turn off flame. If not, you can add another teaspoon of honey.

7. Meanwhile, coat lightly your chicken both sides with some honey and put it into the pre heated oven griller. This helps to "glue" the honey to caramelise it onto the chicken. If you dont have a griller, you can skip this step. Instead, if you do not have a griller, simply place the coated honey chicken back into the sauce pot (meat side down) and leave it for 5mins.

8. Grill the chicken for about 3-5mins on skin side. When you see the nice glaze on the skin (like in photo above), you know its ready.

9. Place meat on dish, pour sauce over the chicken and serve.

Tip 1: If you need to cook for more people, you just need to double the portion of sauce and chicken.

Tip 2: If you dont have mirin, it's fine, just change apple cider to 1/4 instead of 1/8.


Wednesday, April 24, 2013

Fudgy Brownies


Personally, I have not tried this myself but I sure have tried the final product who made it and it was good!


Ingredients
  • ·      250g dark choc            (melted together & cooled slightly)
  • ·       200g butter


  • ·      2 tablespoon instant coffee       (dissolved & cooled)
  • ·       1 tablespoon hot water


  • ·       3 eggs
  • ·       220g brown sugar (white sugar will also do)
  • ·       125g plain flour
  • ·       125g chopped walnuts (may omit and replace with 100g chopped choc instead)
  • ·       200g chopped dark choc


Method

  1. Line a 8x12 inch tin with non-stick baking paper or aluminium foil (for easy removal from tin).
  2. Using a electric beater or hand whisk, beat coffee mixture, eggs & sugar until thick & fluffy.
  3. Stir in melted choc mixture until well combined.
  4.  Stir in plain flour, chopped nuts & chopped dark choc, all at one go. Stir until flour is just incorporated into mixture – DO NOT overstir or your brownies will be stiff instead of fudgy.
  5. Pour into tin and bake for 35mins at 170°C, or until just firm. The center may still be slightly wobbly, but the edges should be slightly pulled away from the tin surface. 

Black Bottom Cupcakes

My friend is an avid baker. She makes the loveliest sweets and so I'm taking the liberty in sharing some of her recipe here.


Black Bottom Cupcakes

Cream Cheese Filling
v 12-oz cream cheese, room temperature
v 1/3 cup sugar
v Pinch of salt
v 2 medium egg whites, room temperature
v 2 tbsp sour cream, room temperature
v 1/3 cup miniature chocolate chips (not full size*)

Cake
v 1 1/2 cups all-purpose flour
v 1/2 cup Dutch-processed cocoa powder
v 1 1/4 cups sugar
v 1/2 tsp salt
v 1 1/4 tsp baking soda
v 3/4 cup sour cream
v 1 1/3 cups water
v 1/2 cup butter, melted and slightly cooled
v 1 tsp vanilla extract


1.     Preheat oven to 180°C. Line two 12-cup muffin tins with paper liners.
2.     Cream cheese filling: In a medium bowl, beat together cream cheese, sugar and salt until smooth. Beat in egg whites and sour cream. Stir in chocolate chips and set aside.
3.     Cupcake batter: In a large bowl, whisk together sugar, salt, flour, cocoa powder and baking soda. Combine sour cream, water, butter and vanilla. Make a well in the center and slowly add in the liquid ingredients, stirring together until just combined and no streaks of flour remain.
4.     Divide cake batter evenly among 24 cupcake liners. Top each portion of batter with 1 rounded tablespoon cream cheese mixture (It is ok to have a little left over).
5.     Bake for about 40-50 minutes. A toothpick inserted into the side (cake only part) should come out with a few moist crumbs on it. Rotate pans halfway through baking if you are using two racks.
6.     Cool in pans for 5 minutes. Cream cheese filling should sink slightly in this time. Remove to wire racks to cool completely.

Makes 24 cupcakes.

*Full-sized chocolate chips will sink to the bottom of the cupcakes, while miniature chips will remain suspended in the cream cheese center.

What those Fish names in Japanese Kanji characters means in English

Came across this in supermarket today at the sushi shelves. Thought of testing myself...couldnt identify all of them but the common ones are easy enough.

Handy to know what u are eating or ask for, while looking at a Japanese menu or at the sushi bar.

鰈 かれい Right eye flounder
鰻 うなぎ Eel
鮑 あわび abalone
鰆 さわら jap Spanish mackerel
鮭 サケ Salmon
鯛 タイ Snapper
鰯 イワシ sardine
鰹 カツオ Bonito
鯒 flathead
鱒 マス Trout
鱈 タラ Cod
鮒 フナ Carp
鮃 ヒラメ flatfish
鰤 ブリ Yellowtail
鯖 サバ mackerel


The rest...completely no idea....Now, to find out how they are pronounced in Cantonese in Hong Kong...


Monday, April 22, 2013

Japanese style Teriyaki Salmon Fillet


Over the year, I have really nailed down cooking salmon to perfection, where the fish is just pink on the inside and still tender. No kidding! I never thought it would happen..but I have arrived. The Queen of Salmon:)


There are various ways to cook my salmon. Commonly I would do the Teriyaki version. During summer with abundance of fresh sweet fruits, I would accompany it with fresh fruit salad of Mango-lychee with fresh greens drizzled in Japanese Sesame with Yuzu ponzu sauce. The  sweetness of the fruit was to balance the citrus ponzu sauce.

The trick to cooking salmon is really catching the exact moment where it starts cooking on the inside. Once you missed it, it is a road of no return with a slap of harden fish.

While the teriyaki sauce version normally wont do this, however I would rub my salmon fillet with garlic salt or seasalt as well. (Otherwise pink salt is fine as well) Otherwise, i tend to find the teriyaki sauce alone is too sweet. .

I didnt have time to take more pictures being in a hurry to serve dinner, but the cooking steps are as below.

Time to Cook: 15mins
Marinate time: 2 hours min.

Ingredients

- Fresh salmon fillets skin on (of about equal thickness if you are cooking more than one)
- Dash of Garlic salt or other salt for all the fillets

- Black pepper grated

- 3tbsp of Mirin. Currently am using mizikan mirin. Frankly this is not my fav mirin but the organic version I was used to is no longer carried in Hong Kong supermart...sigh.

- dash of oil


- 3 tbsp of good quality Sake (Japanese rice wine). Usually I would use "Junmai-shu" (純米酒), which is pure rice wine with no addition of distilled alcohol.  


Seishu

- 1tbsp of sugar
- 3 tbsp of Japanese bottled  bonito soup base.
- 1 tbsp of corn flour or potato flour (this is used only to coat the skin to make it crispy)

I am still tasting out the various Japanese Bonito Soup base sold in Hong Kong supwemart.

Currently I am using "Hirokoshi Soup Base" that includes kelp and bonito flavor. However we had a recent Japanese food fair and as I was chatting with the Oji san at the fair, he introduced me to the bottle on the left which is fast becoming popular in Japan. I tried it and I like it.


Cooking Steps:


  1. Rinse salmon and pat dry. Rub some garlic salt onto the fillet. leave to stand for 10mins.
  2. Add Mirin, Soup base, sake, and sugar into a saucepan. I would add 1 tbsp of water. Stir to blend well. 
  3. Heat up the saucepan over medium low heat. As soon as the teriyaki sauce bubbles and thickens, remove it from heat and allow the sauce to cool. 
  4. Next is to marinate the salmon with some of the Teriyaki Sauce (the fish is fully coated) in a sealed zipped locked bag for at least 2 hours. Unlike pork or other meat, it doesnt really need to be marinated overnight from personal experience. The absorb the flavors really quickly and plus, if you have a a good of fish, you dont really want to ruin the original sweetness of salmon.
  5. Pre-heat the oven to 200 degree Cel..
  6. Remove the salmon from fridge and rub a little oil on the skin.
  7. Using a siever, lightly sprinkle a thin layer the corn flour over the skin. This step is to prevent the skin from burning on contact with hot pan and to add that extra crisp. (Learned this from chef TV program)
  8. Heat up a non-stick pan over medium heat. Add a dash of oil and slide the fish skin side down and pan-sear the marinated salmon until the skin is nicely brown, about 2 minutes. Flip the salmon all round to the sides and top to give it a nice brown searing for the next few mins on each sides.
  9. Transfer the salmon to a oven tray prelined with baking paper. Brush the remaining Teriyaki Sauce on the seared salmon. I would grate some black pepper over the top. Bake for 10 minutes. (Generally this is the right time for any standard fillet)

Tip: For novice cook, in order to be sure you wont be serving semi raw salmon, you may like to stick a butter knife down the middle (where the vertical line is) about slightly under 1 inch to check the inside. It should be a very nice mild pink shade. You might still see there is a gradual change in colour from the outer cook side to the inside which is slightly a tinge of rose pink. That means your fish is ready. Your fish will continue to cook on the inside while you are plating.

Generally you can also tell by pressing lightly on the top of salmon on the thickest part and if the fillet feels very bouncy and wobbly within, its still raw. A cook salmon should not be overly bouncy and a overcook salmon will be firm and wont bounced. Keep trying each time you will soon get the sense and wont even need to cut the fish to check the inside. However, 10mins is normally the right time to cook salmon to a pink moist inside.


Japanese Style Sanma Shioyaki (Grilled Pacific Saury with salt)


I had actually attempted this last Nov and didnt bother to blog about it. This is one of my fav dishes because grilled fishes are sooo yummy. No addition seasoning are required, just the wholesome goodness of the fish....

Sanma Shioyaki (Grilled Pacific Saury with salt)  

Time to cook: 20-25mins

Ingredients:
  • 1-2 Pacific Saury (Sanma)
  • 1/2 Tbsp. sake
  • Sea salt
  • 1 Tbsp. grated daikon (squeeze water out)
  • 1 lemon wedge
  • 1/2- 1 Tbsp. soy sauce
Cooking Steps:

Place the fish vertically on the cutting board and insert knife in the stomach side from top to bottom. Wash and get rid of gut thoroughly in cold water. 
Wash fish

Wipe the entire fish dry with paper towels. (Sanma is usually eaten with intestine so it’s up to you if you want to remove it or not.) I would remove it else there might be some bitter aftertaste if its not fresh...

Remove gut and intestines

In a bowl, sprinkle sake and leave it for 5 minutes. Meanwhile preheat oven to 400F (204C). Line the grill pan with aluminum foil. Make the foil wrinkles first then line the pan so the fish skin won’t get stuck to the aluminum foil. You can also spray oil to prevent sticking to the foil.
Season with sake

After 5 minutes, wipe the fish with paper towels and sprinkle both sides of the fish with salt (Note: salt the fish right before grilling).
Salt fish

Put the fish on the foil and grill until the surface is blistered and brown a bit, about 6-8 minutes. Inside of the fish should almost be cooked (white color).
Grill fish
Flip the fish carefully making sure the fish skin is intact and not attached to the foil. Grill the other side until nicely broiled, about 3 minutes. 

Sunday, April 21, 2013

Chinese Style Oyster Soy sauce Chicken with Carrots and Mushrooms

There are variations to this but I decided to post the one with the updated version with the condensed rich sauce which my man loves. When he polishes off the chicken, he would keep the sauce and dip it with bread: ) I added carrots coz I like them, and also wolfberries to sweeten the sauce more so that I can use less sugar.


Oyster Drumsticks with Chinese Mushrooms and carrots

I didnt follow the traditional recipe and modify it instead, with less dark soy sauce (hence the lighter shade of brown). Also, I dont like to add too much sodium or refined sugar if I can help it.
So u can adjust the oyster to 2TBsp if you want more flavour and rich sauce.

Ingredients

- pack of chilled dozen wings/or drumlettes / or 4 drumsticks
- 2 inch ginger sliced into thin slices (for frying)
- 4 cloves minced garlic
- 1 large smashed garlic clove with skin on (for flavoring oil)
- 1 carrot (optional), cut into 1 inch chucks
- 1 inch of grated ginger
- 6 presoaked Chinese Mushrooms or Shitake Mushrooms or Button mushrooms
- half brown or red onion, cut into chucks (you dont want them too small).
- Rinsed Wolfberries (optional, amount up to you but a small handful. Soak rinsed berries with 2 TBSP of water.)
- 1 normal size mug of water
- 2 stalks of rinsed spring onion

Sauces

- 1.5Tb Light soy sauce
- 1Tb Oyster sauce
- 1 tsp of sugar
- Dash of white or grated black pepper
- 1.5Tbsp  Chinese wine or Shaoxing Wine
- 1tsp of sesame oil
- 2Tbsp of cooking oil. 


Cooking Steps

1. Marinate chicken wings/ drumlets/ drumsticks with all the sauces above, except the sesame oil. 

2. Add the grated ginger and minced garlic and mix well.

3. Leave the marinate to work for at least 20mins.

4. Heat pan with 1 TBSP of cooking oil. Add onion chucks, sliced ginger. Stir fry till onion is starts to soften.

5. Add Chinese Mushrooms and wolfberries & the water.

6. Add 1tsp if Sesame Oil after about 5mins. Stiry fry for another 2mins.

7. Remove from pan all cooked ingredients into a bowl. (Dont prolong or sesame taste will b diluted to nothing. We want to retain a hint)

8. In a clean frying pan, add the remaining 1TBsp cooking oil.

9. When oil is hot, add the clove of smashed garlic to the oil and when it browns, remove.

10. Add sliced ginger and cook till starting to turn light brown. Add 2 half stalks of spring onion (the white part) add the drumsticks, but NOT the marinate sauce. If the chicken starts to stick, u may add a little more olive cooking oil.

11. After about 3mins of turning the chicken drumstick around and nicely brown the skin, add the marinate sauce and add 1 mug of water to dilute. If the sauce is still too salty, you may add more water till it reaches the saltiness level you like. 


12. Add the chopped carrots, this will help sweeten the sauce so dont add any sugar before this.

13. Close the lid of the pot/ wok and at medium flame, give it 10mins. This steam cooking will cook more evenly and soften your carrots nicely.

14. Usually large drumsticks are easy to tell if they are cook when you stop seeing the pink juices seeping out at the top. However, to test if drumstick is cook, poke a fork through. If you still see a lot of red blood juice running out, that means its not ready, stick it with lid close for another 2mins. Retest. Once u see clear juice, its cooked. If u still see a slight pink after alot of clear juices, its fine. the meat will continue to cook within for another few mins on its own. 

15. The sauce should be nice and rich now. If u like it more watery you can add water here and salt/sugar to adjust taste. Usually I dont have to.


16. Throw back the cooked mushroom and onions in.

17. Give it a good toss to combined the mixture.

18. Garnish with chopped spring onion (the green part) if you like.