Thursday, July 21, 2011

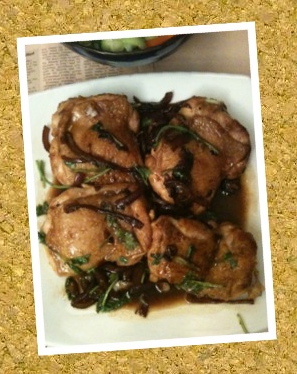
Carmelised Onion with Pan fried Chicken Cutlet (De Boned Chicken Thighs)


Tried a new western recipe - Caramalised Chicken Thigh Cutlets. Takes about 20mins to prepare in advance and another 20mins to cook.


Ingredients

- 2 teaspoons veg oil
- 4 chicken thigh cutlets skin on (800g) WITHOUT bone.
- 1 medium red onion, sliced thinly
- 3 garlic cloves, sliced thinly
- 1/4cup (55g) brown sugar (I usually put less than this. it's up to individual preference)
- 1Tablespoon dark soy sauce
- 1 Tablespoon fish sauce
- 1/3 cup coarsely chopped fresh coriander

Cooking steps

1. Preheat Oven to 200/180 degree cel. fan forced
2. Heat oil in frying pan, pan fry chicken till brown on both sides. Then place chicken in baking tray to bake (uncovered) for another 2-5min till cook through.


3. At the same time, heat clean pan. Reuse a small amount of the oil (previously used to pan fried chicken) and cook onion, garlic stirring until onion softens.
4. Add the sugar and sauces. (I personally will add a little water just to dilute it alittle if you are not using a non stick pan) Stir and cook for another 3 mins or so ( or until you visually see that onion has soften to the level that you like. Some like it more crunchy while like it really soft)
5. Return chicken to pan with coriander. Turn chicken to coat in sauce mixture.

Serve.


Personal Note: (What the recipe doesnt tell you)
++++++++++++++++++++++++++++++

- You can choose not to panfried the chicken till its brown. I just pan fry for about 5-10mins depending on how large the pieces are.

- I just panfried without oil in a non stick pan till the chicken fat is suitably melted before I chuck it into the oven. I personally would prefer Light olive oil instead of peanut oil.

- Always, always cook with the skin side first. The skin acts as an insulator preventing your meat from being cooked too quickly.

- Neither do I bake till the chicken is fully cook as instructed by recipe. Rather I had it baked till about almost cooked (i think 5 mins is a good gauge). The reason is that the chicken still need to undergo more heat cooking when mixing with the sauces. This way, the cutlet will not be tough from being overcooked. At least if its under cook (baked) , easy breezy, just stick it on the pan with sauce longer:P

- Or you can choose not to bake and just pan fry till the meat is cook.
Tuesday, June 21, 2011

Sweet and Sour Pork with Onions and Capsicums.

Tried cooking my mum's Sweet and Sour Pork for the first time, and it was a real success! Thank God!

I was too lazy to go get the pineapples but it turned out alrite though my cheeky husband was like "Where's the pineapple? I like the pineapples!" I had to tell him his wife is too tired and lazy to head out just to grab a can of pineapples and they didnt have fresh ones in the wet market in the morning.

When I was googling for Sweet and Sour pork recipes, I didnt realise there are so many variations out there just for the same dish. Interesting... the recipe mum gave me didnt come with onions but since I love onions, I added it in myself.


For some reason, I had always imagined it to be really difficult but it was actually much easier than expected. The trick is really to get the right portion of meat (梅頭瘦肉)that was "soft" and not "lean" giving the meat the right chew. The dish could be further perfected in terms of the frying part but at least the taste and flavoring was spot on. Phew!

Recipe

Ingredients
---------------

400g pork meat
Green and red capsicums (half each in general. the amount varies depending on your preference)
150g pineapple  diced
potato starch/ corn flour
1tbsp minced garlic
2 red chillies (cut into think shreds)

Marinade
------------
1/2 tsp pepper
1/2 tsp sesame oil
1 egg
1/2 tsp salt
1/2 tsp chicken seasoning powder (w/o msg)
1tbsp potato starch/ corn flour

seasonings
--------------
*1 cup of sweet and sour sauce
a little potato starch mix


Cooking steps

Making the sweet and sour sauce
------------------------------------------
Stir the following seasonings in a pot until sugar dissolve.
- 4tbsp tomato sauce
- 3 tbsp chilli sauce
- 3 tbsp plum sauce
- slightly less than 1 tbsp vinegar
- 1tbsp refined sugar
- 1 tbsp lime or lemon juice
- 1tsp salt
- 3/4 cup of water.

Note: 
*Do not cook too long to retain the sourness of vinegar. If possible, try dissolving the sugar with the 3/4 cup of water first before stirring it to boil with the rest of the sauce mix.

* Use Thail sweet chilli sauce for best mix. Since the bottled sauce taste different for different brand, vary your sugar/ salt level accordingly to the level that suit your taste.

Cooking the Meat
-------------------------
1. Cut the pork into suitable bite size chunks and pound it with the back of the knife to tenderize it.
2. Add marinate and set aside for at least half hour - 1 hour. I did mine for 2 hours in the fridge for best flavor.
3. Cut capsicums into triangular pieces.
4. Coat the pork with starch or corn flour and deep fry in hot oil till golden brown. remove. Peanut oil is best for frying
5. Leave some oil in pan and fry garlic, chillies, capsicums, pineapple (onions optional) till fragrant.
6. Add the pre-prepared sweet and sour sour and bring it to boil.
7. Stir in fried pork and thicken with little potato starch/ corn flour.

Monday, July 21, 2008

Cantonese Style Steam Live Fish

One of the best thing in HK is to getting fresh fish from the wet market and steam the bugger yourself. 

I love eating fish esp steam ones. 

Gonna share a simple steam fish receipe if u are sick of eating dead chilled fish fillet and want a change in scenery. It's really really easy!!! 

Serving: 2 Pax.

Ingredients


1. A live fish. For 2 people, get either 10 or 12 "leung" weight in HK wet market.
I got "Dong Xing" variety. get the fishmonger to clear out the innards.

2. Scallions/ Spring onion. Sliced into thin strips

3. Ripe red tomatoes (1-2)

4. 2 inch Fresh Ginger. 1 inch is sliced into thin strips, another 1 inch is sliced into pieces 

5. Dash of Pepper, (Sea) Salt, Cooking oil, 


6. 3-4 tbsp of light soy sauce.

7. 1-2 tsp of white sugar

The only thing else u need is a good wok/ steamer and a small pot for mixing the sauce.


Cooking Steps.

1. Wash the fish thoroughly and use the back of your knife to run thru the fish to check its properly/ completely descaled. Meanwhile, heat the wok 3/4 filled with water.
(I asked my mum why do we need so much water, she explained sufficient water gives it a more consistent steam to cook the fish thoroughly)

If you happen to see the swim bladder, just use a scissor to remove it. It doesnt smell. Just air.


2. Pat Dry fish with paper towel and place in steaming plate (best are those metal ones. Avail in Japan home store. The thin porcelin plates are ok but any thicker will ruin your timing)

3. Rub a pinch of salt on both side of the fish.Placed the sliced gingers under the fish.
Stick another slice inside the fish where it was slit open.

4. Take the scallion and chop off the green parts, and stick 2-3 stalk of the white end at the base under the fish as well. The idea is for the fish to "absorb" the flavour of ginger and scallion when it is cooking. Also takes about the fishy smell.

5. Rinse and cut the tomato into quarters. Size if up to you but not too small coz they shrink after steaming.
I love tomato so I would use 2 whole tomator and line it round the fish. I dont care for looks, I go for food! :P

6. Optional: Sprinkle some sugar over the surface of the cut tomatoes. Can omit this.

7. When the water is boiling, stick the fish and the contents onto the stand into the wok.
Cover. (You should need to cook this for about 9-10mins, depending on your fish size and the plate you are using. For me, I normally cook it till 9mins, take a look if the eyes have turned white and popped out, and off the flame and cover for another min in residual heat.)

8. While your fish is cooking in that time, get busy with the sauce.
The portion is really up to you. 

9. Take more scallions/ spring onion stalks and chop them into 3-4 segments. Then slice them into narrow strips as well. The finer the better. I personally love eating the end stalk/ the white section more than the green part,. But a mixture is good.

10. Take a small bowl, pour out about 3-4tablespoon of soysauce. The portion is up to you. If you like stronger flavour, you can have more. Then add similar portion of water. Then add about 2 teasppon of sugar to taste. As you stir well, you can just dip your finger and mix till you like the taste, where the sugar takes away the edge of the saltiness of the soy. If the sugar doesnt seem to dissolve, add more water.
The sauce shouldnt be too sweet. And remember, the sauce shouldnt be too dilute since the end steam product will already have natural juice from the fish and tomato.

11. Towards the last 2 mins before your fish is cooked, heat up the small sauce pot. Pour in 2 tablespoon of cooking oil and heat. (I use to use olive oil but its too dense. Mum recommended the KNIFE brand oil, a lighter oil that is specially for cooking fish. You will see a fish on the label picture.).

12. When hot is oil, throw in the ginger slices to cook till golden brown. You shouldnt cook your ginger too early else it will turn soggy. The idea is to when it turn browns just as the fish is cook. So which is why i recommend to start last 2-3 mins before the fish is due to cook.

12. When the fish is done, turn off flame and sprinkle the sliced scallions/spring onion onto the top of the fish.Scoop the browned ginger slices onto the fish as well.Pour some of the oil over the sliced scallions on top of the fish.

13. With the remaining oil, pour in the soysauce mix. Caution, water and oil will result in splashing for the first few seconds. Quickly pour the whole mix and drizzle over the fish from head to tail, ensuring you cover the scallions. Dash some white ground pepper and you are done! 

Monday, April 21, 2008

Grilled Babyback Ribs with Honey Hoisin Sauce


Tried a new recipe last nite - Barbeque Hoisin Sauce Pork ribs. Was simple and easy and turned out quite well on each and every time attempt.

I have tried various meat cuts and frankly, only babyback works the best. Something to do with the fatty oil and tender meat proportion. The usual pork ribs are too flimsy and by the time I grilled it...not left with much meat.

Serving: 2-3 Pax

Ingredients
1. 4 big tbsp of hoisin sauce (abt 125ml)
2. 2 tablespoon of dark soysauce
3. 2 tablespoon of Chinese rice wine
4. 3 tablespoon of tomato sauce (ketchup)
5. 4 garlic cloves, finely chopped or minced
6. a rack of baby back ribs (about 12 bones within)
7. 4 tablespoon for marinate and another 1 tablespoon for blasting sauce.
8. Dash of salt and black pepper


Steps
1. Rinse the pork ribs. You can choose to leave it as a rack to cook, OR, you can split/cut the rack into parts of 2-3 ribs a set. (with a rack of 12, you can get 4 or 6 sets). I will not cut it indivually because the juice will seeped out too much. The reason I cut it is so that more ribs get the crispy sides marinated with sauce, and easily for the people to eat and less cutting.

2. Marinate the ribs with the dark soysauce, chinese rice wine, 4 tbsp of honey, minced garlic and hoisin sauce. Mix well. Leave in fridge to marinate for at least 3 hours.

3. When ready to cook, turn up oven heat to about 250degree or 300 degree on GRILL with fanforced setting.

4. Line the baking tray with a layer of baking paper, and the on top line with aluminum foil. The baking paper prevents any sauce that might seeped over and cause the foil to stick to pan later.

5. Lay the ribs, BONES facing up. Stick into oven when heat is ready. I stuck mine on the uppermost shelf for fast cooking but that means you need to watch your meat..the bone side up also prevent you from over drying your meat or burning them..

*((WHile Waiting, mix the tomato sauce and 1 tbsp of honey with a dash of seasalt into a small bowl. You may add 1 tablespoon of water. Put aside for blasting)

6. Depending on your oven heat, you will only turn the ribs over to the Meat side after your see the the sauce starts to brown nicely and alittle glazy cripsy..Normally this happens after 10-15mins depending on your oven heat

7. After your turn your ribs to the meat side up, you can brush all the leftover marinate over the meat and pour whatever excess u have. Make sure you dont miss the sides.

8. I would at this point also grate some black pepper randomly across the meat.

9. Stick the tray back into oven for another 5 mins. 

10. After 5 mins, Open the oven and spread evenly the tomato mix sauce over the meat surface. This will give your meat a nice sweet and BBQ tinge.) At this point, if you see the meat juice, use a spoon to scoop them out into a small bowl

11. Stick the meat back into the over for another 5-10mins until your meat starts to brown.

12. When you meat is done, take it out and pour all the sauces from tray and the scooped out to drizzle over the meat. You are done!

Monday, May 21, 2007

Singapore Laksa with Prawns, Beansprouts and Eggs.

I miss Laksa when I left Singapore. 

This is a lazy but still authentic version of homemade laksa I have discovered while living in Sydney in 2007 and deprived of a really good Laksa. Yes, even the famous Hunter Street@Martin Place "Malay Chinese Take Away" Laksa doesnt cut it with me because the gravy tastes more like our Chicken Curry and NOT Laksa. So the pleasant find I had was this prepacked Laksa Mix from Prima Taste A box of laksa premix cost about A$4.75 here.


I like to balance my dishes so you might see more ingredients here than necessary. I dont like dried beancurd so I dont include it.

Serving: 2 Pax

Time to Cook:  20mins.

Ingredients


- Box of Laksa Premix
- Pack of Rice Noodles or sphagetti
- A dozen of Fresh Prawns

- Bean sprouts
- 2 Eggs
- Button Mushrooms (optional)
- Some Boy Choy Leafy Vege (optional)
- 8 crab sticks (make sure they are not the overly sweeten type)


Cooking Steps

1. Follow the Laksa Premix Instructions to prepare the sauce. I tend to add extra half cup of water to the mixture.

2. Either boil or steam fresh large prawns and when cooked, rinse with tap water and peel the shell and devein. You may choose to retain the prawn head or remove. if your prawn is not fresh and firmly stuck to the prawn body before cooking, I would remove the head.

3. Throw water, and with fresh pot of boiling water, cook vege for 2 mins and remove from pot. Set aside.

4. In the same hot pot of boiling water, cook mushrooms for 5 mins. Remove from water, set aside.

5. In the same hot pot of boiling water, cook crab stick with plastic for 3 mins, Remove from water, set aside and remove the plastic.

6. In the same hot pot of boiling water, add 2 rinsed eggs and cook them until they are hardboiled eggs. Remove from pot. 

7. Throw water, and with a fresh pot of boiling water, cook noodles. When cooked, portion into the serving bowl. (New water so that your noodles do not absorb all the "flavor from prev ingredients) 

8. In the same pot of used hot water, dip to cook  beansprouts for only a min and remove. Portion on top of noodles.

9. You are ready to place the previously cooked ingredients on top of the noodles.

10. Pour the laksa gravy over the noodle in the serving bowl

This is my bowl of goodness:)