Thursday, June 21, 2012

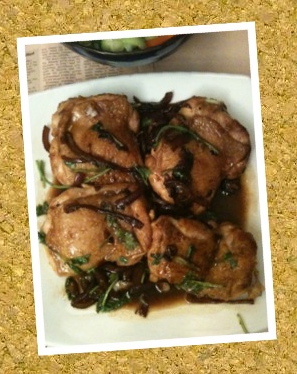
Taiwanese style Braised Pork with Carrots and Mushrooms


Made Taiwanese style soy braised pork tonight. This is one of my favorite because it is so easy to make, short time taken and yummy to eat with rice.


Serving: 2 Pax

Ingredients

1. 2 medium size Collar (neck) pork.
2. Pre soaked Fresh Chinese/Japanese Mushrooms - (amount subjective, at least 4 will be nice.)
3. Carrot strips (amount subjective - usually half a carrot will do)
4. 4 big Garlic cloves - coarsely chopped
5. Dark Soy Sauce (Using Taiwanese Kim Lan brand) (老抽/黑酱油)
6. (Kim Lan brand) Soy Paste (金阑酱油膏)

7. Rock Sugar & fine sugar
8. Wu Siang Fen - 1 tsp
9. Fried Onion Shallots - 2 tbsp.
10. Oil for frying (am using coconut or olive oil)
11. 8 Soaked Red dates, deseeded.
12: Pine nuts (optional)


Prepare sauce

1. Mix 1/2 cup of soy sauce with 1/3 cup Soy paste (you can lessen the portion. I dont even rem if its 1/2 cup coz I do a visual estimate)
2. Mix in the Wu Siang Fen
3. Put in 1 tsp of brown/white sugar and 5 small rock crystal cube sugar. 
4. Pour in 2 cup of water

Cooking Steps

1. Cut the pork into cube or slice bite size.
2. Heat 2 Tbsp of oil. Stir fry chopped garlic until just light brown, throw in the pork and fry together till pork is cooked in wok. About 5mins.
3. Pour in prepared sauce. Lower to medium flame. Cover lid for 5mins and stir.
Optional: (4. If you have earthen pot or those ceramic pot, it is best to use them over metal wok to gives tenderise the meat as it absorb the flavour. However if you have none, you can still use wok. Transfer from wok to earthen pot if you can. Cover lid.)
5. Mix in the fried Onion Shallots. Estimate 2 tbsp or more if you like.
6. Mix in mushroom strips & the 2 red dates.
7. taste the sauce, if too salty, add more water.
8. Cover and simmer over low flame for 15mins. 
9. Add carrot strips now. Taste the sauce. if it is still not sweet, add a few more cube rock sugar or you can wait till after you add carrot to decide. (carrots will also sweeten the sauce) .
Soy sauce gets saltier when cook over time, so add more water if necessary. it's subjective so I wont indicate how much to pour in.
10. Cover simmer till meat is tender. Generally another 10-15mins give or take.
11. Garnish with Pinenuts.

Monday, February 27, 2012

Steamed Large Prawns with fried Chilli Garlic & Soysauce

Saw the freshest lovely live prawns in the wet market tonite and couldnt resist them at all! So bought some back for steam prawns. A quick and super easy meal to prepare tonight! Looking at all the live produce, I really think this is the BEST thing about living in HK. 

Anycase, back to my dinner ingredients for tonight! I dont like fried food, but really like most of my dishes steamed if I can. I dont like to stir fry prawns either, esp not when they are this fresh! Just the colors alone are mouth watering. My hubby and I were laughing at the prawns with its motor fast wriggling legs (backstrokes paddling on its back) in the water. Then I was laughing at my partner for taunting the prawns that they will soon be eaten. What a grown up big kid! That aside, here's my simple steps for 15-20 mins cooking.


Serving: 2 pax.

Ingredients


1. Rinsed Prawns (about 10-11 medium size)
2. Finely Chopped garlic (not minced, so dont use those garlic crusher). - 4 cloves. For Frying
3. Finely sliced ginger strips, quantity up to your personal preference. This is for frying
3. Roughly sliced Ginger pieces, about 6 pieces. For Steaming with prawns
4. Chopped rinsed scallions or Spring onion - 1 stalk.
5. Clear Chinese Rice wine. I suppose u can use shaoxing wine but I didnt.
6. 1/2 of a big chilli, deseeded and minced. NOT chilli padi
7. 1 stalk of spring onion, halved vertically. Only need the bottom of the stalk, meaning, the half with the bulb minus the roots. Dont really need the green bits. For steaming

Sauce Ingredient

1. 1- 1.5 Tsp of Fish sauce
2. 1/2 Tsp of Sugar
3. 1-2 Tablespoon of soya sauce


Cooking Steps

1. Just 10mins before cooking, mix 5 tablespoon of chinese rice wine into the rinsed prawns to season. If your prawns are still alive like mine, they wont like it and will jump, so cover with a lid or plate.
2. Line prawns into a steaming metal plate. Try not to pile them to ensure evenly cooked.
3. Throw in the sliced ginger and halved spring onion into the prawn lot to steam with.
*4. Cover the plate with foil and poke holes randomly all over to allow steam to get in. The foil is only required if u have live prawns to prevent the suicidal prawns jumping into the boiling water. So this is optional.
5. Steam prawns for about 8-10mins depending on your prawn thickness, mine was cooked for 10-11mins for the prawns were 1.5-2 fingers width big and I had covered the plate with foil.
you should know its cook when it turned bright red throughout from head to tail.
6. Put the chopped spring onion onto the prawns

Sauce Steps
1. In a sauce pot, heat 2 tablespoon extra light olive oil.
2. Fry chopped garlic and finely sliced ginger strips. When browned, remove from oil.
3. Next, fry the minced unseeded chilli for a min or less and remove from oil.
4. When prawns are ready, pour the excess liquid from the steamed dish and mixed with sauce ingredients above. This helps to dissolve the sugar.
5. Heat up the previous frying oil, and when warm, pour the sauce mixture into the warm oil and quickly remove from heat and pour the bubbled up sauce into the steamed prawn. Pour all over the prawns.
6. Add the fried garlic, ginger mixed with the chilli over the prawns.

Voila. Done.


Saturday, January 21, 2012

Cooking: Tangy Chinese Spare Ribs [糖醋排骨]

Finally after multi-levels of procrastination, I decided to try cooking the pork ribs that had been on my "to try" list for months now. 

I like tangy spare-ribs [糖醋排骨]and been meaning to make them for ages now. One of the reason it took so long was because I was hoping to find a small bottle of Black vinegar as required ingredients. I think it turned out well:)


Sauce Ingredients:
1. Zhejiang Vinegar (浙江醋)- 2 tablespoon
2. Black Glutinous Vinegar (烏醋)- 2 tablespoon (required! It gives the dish the nice rounded sweet taste like 排骨王)
3. 2 teaspoon heaps of white sugar, or use cubes of icing sugar (冰糖)(personally I prefer the latter)
4. Tomato sauce - 1.5- 2 tablespoon (i just gauge when I cook)
5. Dash of cornflour - 1/2 - 1 teaspoon for those precision cookers.
6. Dark soysauce - 1 tablespoon
7. Plum sauce (梅漿)- 1 teaspoon

Marinade A:
1. Sugar - 1/2 tablespoon
2. Lemon Juice - 1 teaspoon
3. Salt - 1/2 teaspoon
4. water - 1 tablespoon (I kinda omit this because the ribs were already wet after rinsing)

Marinade B:
1. Plain Flour (面粉)- 1 tablespoon
2. Potato (太白粉)or Corn flour - 1 tablespoon
3. water - 1 tablespoon ( to combine the flour)

Cooking steps
1. Marinate the ribs prior to cooking. First marinate the ribs with Marinade A for at least an hour. Stick it in the fridge.

2. Combine the marinated ribs with Marinade B and set aside for at least 30mins.

3. Heat (peanut/coconut) oil over medium flame and deep fry the marinated ribs.
Remove ribs when it is golden brown. Cook longer if ur ribs are very cold or very thick. Hard to burn ribs if u are watching it as u deep fry. Note, do not over heat the oil too much at the start or u will burnt the meat rather than cook it through.

4. While your fried ribs are draining oil on the side, use a different pot, put in a tablespoon of the used oil and then pour in the Sauce mix into the pot and stir over low flame. This is the time you get to adjust the taste. If you think its too sour, add more (2-3) icing cubes (or sugar). Dont overdo it. moderate bit by bit. Do not make it too sweet as the flavor will change again when combined with the ribs. Note: Do not stir over heat too long or you will lose the vinegar aroma.

5. Add a little corn flour if the sauce is still too watery but not too thick else its hard to coat the ribs later. (optional step)

6. Reheat the pot of frying oil and do a quick refry 10-15seconds before serving. (optional if the time lag between sauce preparation and serving is not long)

7. Pour the sauce over the ribs and mix well. Let the fried layer of the ribs soaked in the flavor of the sauce before serving (that's about a min or two. The taste will differ slightly when ribs are very hot and when cooled)

PS: I didnt have plain flour so I had only used the corn flour. This wont affect the taste but will affect the layer of batter on your ribs.

Thursday, July 21, 2011

Carmelised Onion with Pan fried Chicken Cutlet (De Boned Chicken Thighs)


Tried a new western recipe - Caramalised Chicken Thigh Cutlets. Takes about 20mins to prepare in advance and another 20mins to cook.


Ingredients

- 2 teaspoons veg oil
- 4 chicken thigh cutlets skin on (800g) WITHOUT bone.
- 1 medium red onion, sliced thinly
- 3 garlic cloves, sliced thinly
- 1/4cup (55g) brown sugar (I usually put less than this. it's up to individual preference)
- 1Tablespoon dark soy sauce
- 1 Tablespoon fish sauce
- 1/3 cup coarsely chopped fresh coriander

Cooking steps

1. Preheat Oven to 200/180 degree cel. fan forced
2. Heat oil in frying pan, pan fry chicken till brown on both sides. Then place chicken in baking tray to bake (uncovered) for another 2-5min till cook through.


3. At the same time, heat clean pan. Reuse a small amount of the oil (previously used to pan fried chicken) and cook onion, garlic stirring until onion softens.
4. Add the sugar and sauces. (I personally will add a little water just to dilute it alittle if you are not using a non stick pan) Stir and cook for another 3 mins or so ( or until you visually see that onion has soften to the level that you like. Some like it more crunchy while like it really soft)
5. Return chicken to pan with coriander. Turn chicken to coat in sauce mixture.

Serve.


Personal Note: (What the recipe doesnt tell you)
++++++++++++++++++++++++++++++

- You can choose not to panfried the chicken till its brown. I just pan fry for about 5-10mins depending on how large the pieces are.

- I just panfried without oil in a non stick pan till the chicken fat is suitably melted before I chuck it into the oven. I personally would prefer Light olive oil instead of peanut oil.

- Always, always cook with the skin side first. The skin acts as an insulator preventing your meat from being cooked too quickly.

- Neither do I bake till the chicken is fully cook as instructed by recipe. Rather I had it baked till about almost cooked (i think 5 mins is a good gauge). The reason is that the chicken still need to undergo more heat cooking when mixing with the sauces. This way, the cutlet will not be tough from being overcooked. At least if its under cook (baked) , easy breezy, just stick it on the pan with sauce longer:P

- Or you can choose not to bake and just pan fry till the meat is cook.

Tuesday, June 21, 2011

Sweet and Sour Pork with Onions and Capsicums.

Tried cooking my mum's Sweet and Sour Pork for the first time, and it was a real success! Thank God!

I was too lazy to go get the pineapples but it turned out alrite though my cheeky husband was like "Where's the pineapple? I like the pineapples!" I had to tell him his wife is too tired and lazy to head out just to grab a can of pineapples and they didnt have fresh ones in the wet market in the morning.

When I was googling for Sweet and Sour pork recipes, I didnt realise there are so many variations out there just for the same dish. Interesting... the recipe mum gave me didnt come with onions but since I love onions, I added it in myself.


For some reason, I had always imagined it to be really difficult but it was actually much easier than expected. The trick is really to get the right portion of meat (梅頭瘦肉)that was "soft" and not "lean" giving the meat the right chew. The dish could be further perfected in terms of the frying part but at least the taste and flavoring was spot on. Phew!

Recipe

Ingredients
---------------

400g pork meat
Green and red capsicums (half each in general. the amount varies depending on your preference)
150g pineapple  diced
potato starch/ corn flour
1tbsp minced garlic
2 red chillies (cut into think shreds)

Marinade
------------
1/2 tsp pepper
1/2 tsp sesame oil
1 egg
1/2 tsp salt
1/2 tsp chicken seasoning powder (w/o msg)
1tbsp potato starch/ corn flour

seasonings
--------------
*1 cup of sweet and sour sauce
a little potato starch mix


Cooking steps

Making the sweet and sour sauce
------------------------------------------
Stir the following seasonings in a pot until sugar dissolve.
- 4tbsp tomato sauce
- 3 tbsp chilli sauce
- 3 tbsp plum sauce
- slightly less than 1 tbsp vinegar
- 1tbsp refined sugar
- 1 tbsp lime or lemon juice
- 1tsp salt
- 3/4 cup of water.

Note: 
*Do not cook too long to retain the sourness of vinegar. If possible, try dissolving the sugar with the 3/4 cup of water first before stirring it to boil with the rest of the sauce mix.

* Use Thail sweet chilli sauce for best mix. Since the bottled sauce taste different for different brand, vary your sugar/ salt level accordingly to the level that suit your taste.

Cooking the Meat
-------------------------
1. Cut the pork into suitable bite size chunks and pound it with the back of the knife to tenderize it.
2. Add marinate and set aside for at least half hour - 1 hour. I did mine for 2 hours in the fridge for best flavor.
3. Cut capsicums into triangular pieces.
4. Coat the pork with starch or corn flour and deep fry in hot oil till golden brown. remove. Peanut oil is best for frying
5. Leave some oil in pan and fry garlic, chillies, capsicums, pineapple (onions optional) till fragrant.
6. Add the pre-prepared sweet and sour sour and bring it to boil.
7. Stir in fried pork and thicken with little potato starch/ corn flour.